Lenovo Laptop Serial Number Update for more than 7 digit Serial Number

Step 1: Boot the System with Serial number Update Bootable USB Drive.


Step 2: In the Main Menu Select "Set System Identification".
 
 
Step 3: Select "Add S/N data to EEPROM"( i.e. Option 1).
 
 
Step 4: Insted of Entering  " 20" , Enter " C0 " (Will not Appear in the Screen)


Step 5 :  When updating the System unit Serial number.The Information must be Entered in the following Syntax 
                  (All Alphabetic characters need to be entered as CAPITALS).
 
            Example : 1S20ASA04DINR900R3 Where "1S" Precedes Type Number,Model,Country Code,Serial number. The total no of characters is 20. 
 
                Machine Type     : 4 Digit
                Model Type         : 4 Digit
                Country Code      : 2 digits
                Serial Number     : 8 digits


Step 6: After Updation Successful select #9 to exit to Main Menu
Step 7: Choose Option 4 to Set UUID
Step 8: Press Enter to Exit the UUID and Pess F3 to Exit and Reoot the Thinkpad
 

What is RAID and RAID Levels

RAID: RAID is a data storage technology that combines multiple disk drive components into a logical unit for the purposes of data redundancy and performance improvement. Data is distributed across the drives in one of several ways, referred to as RAID levels, depending on the specific level of redundancy and performance required.

On most situations you will be using one of the following four levels of RAIDs.
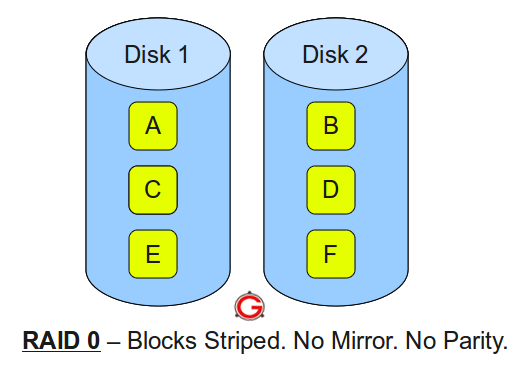
  • RAID 0
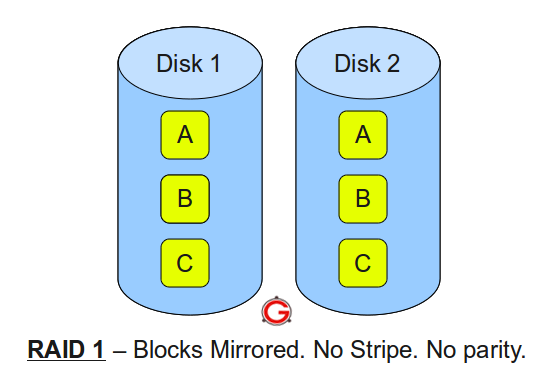
  • RAID 1
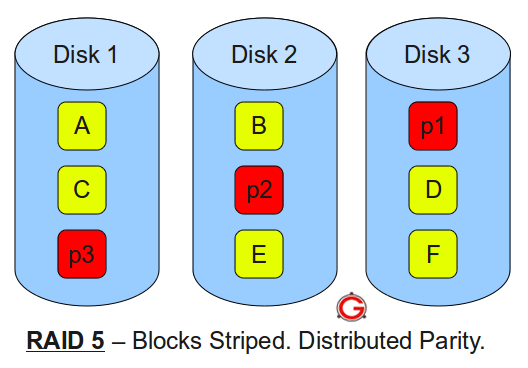
  • RAID 5
  • RAID 10 (also known as RAID 1+0)
This article explains the main difference between these raid levels along with an easy to understand diagram.

In all the diagrams mentioned below:
  • A, B, C, D, E and F – represents blocks
  • p1, p2, and p3 – represents parity

 RAID LEVEL 0

Following are the key points to remember for RAID level 0.


Following are the key points to remember for RAID level 0
  • Minimum 2 disks.
  • Excellent performance ( as blocks are striped ).
  • No redundancy ( no mirror, no parity ).
  • Don’t use this for any critical system.

RAID LEVEL 1


Following are the key points to remember for RAID level 1.
  • Minimum 2 disks.
  • Good performance ( no striping. no parity ).
  • Excellent redundancy ( as blocks are mirrored ).


RAID LEVEL 5


Following are the key points to remember for RAID level 5.
  • Minimum 3 disks.
  • Good performance ( as blocks are striped ).
  • Good redundancy ( distributed parity ).
  • Best cost effective option providing both performance and redundancy. Use this for DB that is heavily read oriented. Write operations will be slow.


RAID LEVEL 10


Following are the key points to remember for RAID level 10.

  • Minimum 4 disks.
  • This is also called as “stripe of mirrors”
  • Excellent redundancy ( as blocks are mirrored )
  • Excellent performance ( as blocks are striped )
  • If you can afford the dollar, this is the BEST option for any mission critical applications (especially databases).

How to Create Bootable Pendrive for windows OS Installation

Making a pen drive bootable is possible in Windows7 & Windows8 operating system. Formatting a computer to install fresh Windows OS with a CD/DVD drive is not very good because it takes too much time to install fresh Windows operating system. There can also be a problem for many people that CD/DVD drive doesn’t work properly. So this can be a problem for them. Today laptop or desktop comes many USB ports. So there is no need of CD/DVD drive to format a system. Formatting is very fast and easy with flash drive/pen drive and also no software is required for this method. Windows7 or Windows8 command prompt can do the work with few lines of command. Just follow this tutorial.

Start your command prompt.

 For windows7 users:
Go to “Start” button and click. Write “cmd” then cmd icon will appear on the top of the panel. (Fig.1)
Starting Windows CMD
Fig.1-Starting Windows CMD
“Right click” on the cmd icon and click “Run as administrator”. (Fig.2)

Running Command Prompt As Administrative
Fig.2-Running Command Prompt As Administrative

It will open the command prompt. (Fig.3)
Windows 7 CMD Window Pops Up
Fig.3-Windows 7 CMD Window Pops Up

For windows 8 users:
Press “Windows key” and press “c”. You will see the command prompt icon. “Right click” on the command prompt icon and click “Run as administrator” from the bottom bar. (Fig.4)
Windows 8 CMD Window Pops Up
Fig.4-Windows 8 CMD Window Pops Up

It will open the command prompt like in Fig.3
Now following steps are same for the windows7 and 8 OS.
Type “diskpart” inside the command prompt and hit “ENTER”. (Fig.5)
Type diskpart And Enter
Fig.5-Type diskpart And Enter

It will good before going to next step that you should disconnect all other external hard disk, flash/pen drive etc. because accidently these drive can be formatted. So taking precaution is good. Only one pen drive with minimum 4 GB should be connected. Save all the data from the pen drive because it will be formatted in one of the following step.
After last step type “list disk” inside the command prompt and hit “ENTER”. (Fig.6)
Type list Disk And Enter
Fig.6-Type list Disk And Enter

This will show all disk connected to the system like DISK 0, Disk 1, and so on with “Status”, “Size” , “Free” etc.. We can recognize the pen drive with size. Disk 0 will be the system disk in which the windows OS is installed. In this tutorial Disk 1 is the pen drive (3855MB=4GB). This pen drive is going to be a bootable pen drive.
Type “select disk 1” inside the command prompt and hit “ENTER”. It will select the disk 1 (pen drive) for all coming steps. (Fig.7)

Type select Disk 1 And Enter
Fig.7-Type select Disk 1 And Enter

Type “clean” and hit “ENTER”. It will erase all the data from the pen drive. (Fig.8)
Type clean And Enter
Fig.8-Type clean And Enter

Type “create partition primary” and hit “ENTER”. It will create a primary partition in pen drive. (Fig.9)
Type create partition primary And Enter
Fig.9-Type create partition primary And Enter

Type “select partition 1” and hit “ENTER”. It will select the partition created in the last step. (Fig.10)
Type select partition 1 And Enter
Fig.10-Type select partition 1 And Enter

Type “format=fs ntfs quick” and hit “ENTER”. It will format the pen drive quickly with NTFS file type. (Fig.11)
Type format=fs quick And Enter
Fig.11-Type format=fs quick And Enter

Type “active” and hit “ENTER”. It will make partition as active for booting after restarting the computer. If this is step is missed then computer will not boot from the pen drive. (Fig.12)
Type active And Enter
Fig.12-Type active And Enter

Type “exit ” and hit “ENTER” to close the diskpart and close the command prompt window. (Fig.13)

Type exit And Enter
Fig.13-Type exit And Enter

Now the pen drive has become bootable. Now all the files from root of Windows operating system setup DVD or ISO has to copy inside the pen drive root.
So open the Windows setup file from DVD or ISO and copy all file by selecting with “Ctrl+A” and paste it inside the pen drive’s root folder as shown in the figure. (Fig.14) 

Copying All Files And Pasting It
Fig.14-Copying All Files And Pasting It

After complete copy, the pen drive will be a bootable for Windows 7 and Windows 8 OS completely. You just need to “Restart” your computer. “Restart” your computer. When BIOS screen appears then press “F12” key. It will show the options to boot from CD/DVD drive, hard disk and pen drive. Just scroll down to pen drive and hit “Enter”. Your system will boot from pen drive. Now you can install windows OS.

How to Change Password Using Command Prompt in Windows systems

This Articular will help you to change password using command prompt.

Step 1: Open CMD and type net user it will dispaly the number user accounts
 

Step 2: Type net user "Userame" "new Password".

Lenovo Laptop HDD Crash Prevention


Problem: Lenovo laptop Hard disk  crashes suddenly

Some of the Lenovo Laptop Hard disk will suddenly Failure. We will not Determine the Exact causes for failures due to OS or Hard disk.

Major Causes for HDD Crash:

1)      Most of the Users will not Properly shutdown their Laptops after use.
2)      Most of the users will not Shutting down their Laptops when they are in Travel or moving(Mobile Users), Due to This
·         The laptop will undergo for sudden shock and vibration.
·         Due to the Sudden Shock and vibration the HDD Read/Write Head will failure.


We will not cure the Defective HDD but we can Prevent from Failure in Feature" Prevention is better than Cure"

Solution:  Think Vantage Active Protection System For Hard disk
 
Overview:
 
When the Active Protection system is enabled, it protects your hard drive when the shock sensor inside your Think Pad computer detects a situation that could potentially damage the hard drive.
The protection system stops your hard drive by moving the read/write heads of the hard drive to areas that do not contain data, and may also stop spinning the disks of the hard drive.
The hard drive is less vulnerable to damage when it is not in operation. The protection system turns the hard drive on again once the shock sensor detects a stable environment (minimal change in system tilt, vibration, or shock).
 
 
Installation and Configuration:
 
· Download the Think Vantage Active Protection System from Lenovo Website and Install.
 
download.lenovo.com/ibmdl/pub/pc/pccbbs/mobiles/n15sk03w.exe
 
·         Open the Active Protection from System and Make changes as below.


Observations:
 
System running Normally without shock and vibration
 
 
                                System is in repetitive shock


                      When System has detected a Shock or vibration the Hard Drive will Stop working Automatically


                                The following is displayed when the Active Protection system is disabled


Note:  This will not effect the  Performance of the Laptop( Because the all Actions done with in milliseconds).

How to find BIOS Version

The term BIOS, or Basic Input/Output System, originally referred to a specific type of interface between a computer system's firmware and its operating system. However, among consumers, the term BIOS has evolved into a term used to describe any interface between firmware and operating system. Some PC-based systems now use Unified Extensible Firmware Interface (UEFI), however most systems still use the BIOS interface. Apple's Intel-based systems have transitioned from the Open Firmware interface to the Extensible Firmware Interface (EFI). In order to update your system's firmware, you will need to know the specific firmware to operating system interface your system uses and what version it is. In this article you will learn how to determine the interface your system uses and how to check which BIOS version your system is running.
Method 1:

MSinfo32 Method: Determine the BIOS version in Windows 7 using the "msinfo32" command. Select "Run" from the start menu, type "msinfo32" into the open field and click "OK." Locate the BIOS version/date entry in the items column. The BIOS information will be listed in the adjacent column labeled "Value."


Method 2:

Command line method: Select "Run" from the start menu, type "systeminfo" into the open field and click "OK." Locate the BIOS version in the column on the right. The BIOS version will be listed in the adjacent column.

How to Find System Serial number using Command

Here is a quick command that you can use to find the Serial Number of your machine.

To find the serial number, open command prompt (cmd) and type the following command.

c:\wmic bios get serialnumber

This will give you your machine’s serial number by pulling the information from BIOS. This is how it will look like.


How to install and configure DHCP on windows server 2012

Introduction

Dynamic host configuration protocol (DHCP) is one of the most commonly implemented network services in today’s network environments. In this article I will review the deployment and configuration of the DHCP server role in Windows Server 2012. We will revise the DHCP leasing process, DHCP options, DHCPv4 and DHCPv6 scopes, and auto configuration.

DHCP is primarily used to automatically distribute critical IP configuration settings to network clients, eliminating the tedious and burdensome task of manually configuring hosts on TCP/IP-based networks. It also provides configuration information and interacts with other networking services such as domain name system (DNS), windows deployment services (Windows DS) and network access protection (NAP).

Without DHCP service, you have to individually configure each network client with the correct internet protocol settings, including the IP address, the network’s subnet mask, the default gateway, and the DNS server address. These settings are necessary for the network clients to communicate within and outside their network locations. You have to repeat this manual configuration process any time you bring a new device to the network or you move one to a different subnet.

Many organizations manage hundreds or thousands of network client devices, including smart phones, tablets, desktop computers, and laptops. The DHCP service helps to ensure that all network clients have correct configuration settings, eliminating fat fingers and other human errors that may occur when we have to enter the information manually. Network configuration changes can be updated on the DHCP server without having to change the information directly on each client computer.

DHCP Server Authorization

In an active directory infrastructure, to prevent an incorrectly configured DHCP server or a rogue DHCP server from distributing IP addresses, DHCP servers are not allowed to start servicing clients before they are authorized to operate in the network. DHCP authorization is the process of registering the DHCP Server in the active directory database to service DHCP clients. An enterprise administrator account is necessary to authorize Windows Server 2012 DHCP servers; once it is authorized, the DHCP server can support multiple domains in the same active directory forest.
A standalone (no domain member) Windows Server 2012 DHCP server can detect an authorized DHCP server in a domain. When that happens, the standalone DHCP server does not lease IP addresses and shuts down automatically.

Deploying the DHCP Server Role

These are the steps necessary to add the DHCP server role to a Windows Server 2012 computer:
  1. In Server Manager, click Add roles and features.
Image

  1. In the Add Roles and Features Wizard, click Next.
Image

  1. On the Select installation type page, click Next.
Image
  1. On Select destination server page, click Next.
Image
  1. On the Select server roles page, select the DHCP Server check box.
Image
  1. In the Add Roles and Features Wizard, click Add Features, and then click Next.
Image
  1. On the Select features page, click Next.
Image
  1. On the DHCP Server page, click Next.
Image
  1. On the Confirm installation selections page, click Install.
Image
  1. On the Installation progress page, wait until the Installation succeeds.
Image

Once the installation completes, you can proceed to authorize the DHCP server or start configuring the DHCP scopes.

DHCPv4 Scopes

By configuring DHCP scopes, you make IP addresses available to the DHCP clients. A DHCP scope is a pool or range of IP addresses that are available for lease from the DHCP server. Usually a DHCP scope is limited to the IP addresses in a prearranged IP subnet. DHCP scopes must be activated before their IP addresses become available in the network.

On Windows Server 2012, you configure a DHCP scope along with the following settings:

Name and description. This is used to identify the scope. The name is mandatory, the description is optional.

IP address range. This is the starting pool of IP addresses that are available for lease. This pool usually lists the entire range of addresses for a defined IP subnet.

Subnet mask. This property provides space to configure the bit length and the decimal notation for the subnet mask.

Both fields are automatically filled when you enter the IP address range. You may need to change those values when using non default class A, B, or C networks. The subnet mask is used to separate the network ID from the host ID component in the IP address; this allows TCP/IP hosts to determine their location in the network.

Exclusions. Here you list single addresses or range of addresses that belong to the IP address pool, but that will not be offered for lease usually because they have been manually assigned to servers in the network. For example, if the DHCP server is deployed to the same subnet, it will need at least one IP address from the pool. That IP address should be excluded from the scope.

Subnet Delay. This is the amount of time in milliseconds that the DHCP server waits before sending a DHCPOFFER. The default value is 0; when having two DHCP servers servicing the same IP subnet, you may change the default settings on your lower-priority DHCP server by increasing the subnet delay value.

Lease duration. This is the amount of time for which clients are allowed to use the IP addresses without renewal. It is recommended to use shorter durations for scopes with limited IP addresses or a significant number of mobile clients, and longer durations for more static networks.

DHCP Reservations:
A DHCP reservation is a given IP address from within a scope that is set aside for lease to a specific DHCP client. DHCP reservation ensures that the IP addresses that you reserve from a configured scope are not leased to any other device in the network. A DHCP reservation also ensures that devices with reservations are certain to have their IP address even if a scope runs out of available IP addresses. The device’s network interface media access control (MAC) address or physical address is necessary to configure a reservation. If the client is already leasing an IP address from a Windows Server 2012 DHCP server, its MAC address will be available from the DHCP management console.

DHCP Options:
DHCP options are configuration settings that are applied to the DHCP clients when they lease or renew their IP addresses from a DHCP server. An option code identifies the DHCP options; many DHCP options are available, among the most common ones are:
  • * Option 003 – Router (the default gateway for the subnet)
  • * Option 006 – Domain Name System (DNS) servers
  • * Option 015 – DNS suffix
On a Windows Server 2012, you can configure DHCP options at the server, scope, reserved client, and class levels. When troubleshooting the DHCP service, it is critically important that you understand the order in which DHCP applies these options to client computers. DHCP options are applied in the following order:
  1. Server level. A server-level option is assigned to all DHCP clients of the DHCP server. Server options can be superseded by scope, class, and client-assigned options.
  2. Scope level. These settings are applied to clients that obtain a lease within that specific scope. Scope options consistently apply to all computers acquiring a lease from a given scope unless they are superseded by class or reserved client options.
  3. Class level. Client class can be user-defined or vendor-defined. A class-level option is assigned to all clients that identify to the DHCP server as members of a class. Class options can be superseded by reserved client level options.
  4. Reserved client level. This is a reservation-level option that is assigned to one DHCP client. If DHCP option settings are configured at each level and they conflict, then the option that is applied last overrides the previously applied setting. Because the reserved client options are the last one to apply, they will override all the previous levels in case of conflicting settings.

DHCP Lease Generation Process

Understanding the steps involved in the lease and renewal of IP addresses helps you troubleshoot problems when clients cannot obtain their configuration from a DHCP server. There are four steps in the DHCP lease process:
  1. DHCPDISCOVER. The DHCP client broadcasts a DHCPDISCOVER packet in the subnet. All computers in the subnet receive this packet; however, only the DHCP server responds. If there is no DHCP server in the subnet, then a computer or router configured as DHCP Relay agent forwards the message to a DHCP server located in another subnet
  2. DHCPOFFER. All DHCP servers that receive the client DHCPDiscover packet reply with a DHCPOffer packet. This packet contains IP configuration settings including an available IP address and subnet mask.
  3. DHCPREQUEST. The client might receive DHCPOFFER packets from more than one DHCP server; if that is the case, the DHCP client typically selects the DHCP server that responded first to its DHCPDISCOVER packet. The client then broadcasts a DHCPREQUEST identifying the DHCP server from which is willing to lease the IP settings. This broadcast reaches all other the DHCP servers so they know which server’s DHCPOFFER the client has accepted.
  4. DHCPACK. The selected DHCP server stores the IP address client information in the DHCP database and sends back a DHCPACK message and any optional configuration parameters. It is possible for the DHCP server to send a DHCPNAK message; this may happen if the IP address is invalid or it is being used by another computer. In this case the client begins the lease process again.
DHCP clients try to renew their leases after every reboot or startup. This is a great feature, especially for mobile devices since users may move their laptops or tables to different locations or subnets and those devices can automatically obtain the right IP configuration to operate in the new environment. The lease period is reset after each renewal. You can force a renewal by executing the following command: ipconfig /renew. If a device stays on, it will attempt to renew its lease when 50% of its lease time has elapsed. This is a transparent background process in which the DHCP client broadcasts a DHCPREQUEST message. If the DHCP server that leased the IP addresses is available, it will send a DHCPACK message back to the client. If some options have changed since the original lease, the DHCP server includes the new values with the DHCPACk message.
If the DHCP client cannot talk with the DHCP server, then the client waits until 87.5 percent of the lease time passes and then tries to renew again. If 100 percent of the lease time has expired and the renewal is unsuccessful, the client goes into autoconfiguration mode.

DHCPv4 Autoconfiguration

If a DHCP server is not available and the previous lease has expired, the client computer executes an automatic private IP addressing (APIPA) process to assign itself a valid IPv4 address from the 169.254.0.0 subnet with a mask of 255.255.0.0. Before it starts using the new IPv4 address, the client performs an address resolution protocol (ARP) test to ensure that the selected IP address is not being used by any other client in that network. After it configures itself with its new APIPA address, the client keeps sending broadcasts every five minutes to the network, trying to contact a DHCP server. Whenever a DHCP server responds, the client negotiates a new lease, and configures the NIC with the new IPv4 address obtained from the DHCP server.

ThinkPad Helix bootup failure when pressing the Power button

TITLE:
ThinkPad Helix bootup failure when pressing the Power button
SYMPTOM:
The ThinkPad Helix system has no power or video after pressing the Power button.
AFFECTED CONFIGURATIONS:
ThinkPad
AFFECTED SYSTEMS:
Helix
SOLUTION:
If the Power button is pressed and no video shows on the LCD, follow these steps below:
1. Check to see if the fan or the LED in the ThinkPad logo turns on.If they turn on, there is likely an issue with the video/LCD and not the power. If neither the fan or LED turn on, continue to Step 2.
 
2. Plug in power and try to power on the system again. Try plugging into the Dock and the Tablet.
 
3. Disconnect the power adapter and press the battery reset button.The location of the reset button is shown in the picture below. If the system does not power on, then reconnect the power adapter.
 
4. Disconnect the power adapter and remove the LCD. Do not disconnect the ribbon cables. Disconnect and reseat the battery connector. The connector should be fully seated as shown in the picture below. If the system does not power on, you may need to reconnect the power adapter.
 
5. If the system still has not powered on, the battery should be
replaced.

ThinkCentre M72e and Edge72 systems may fail to complete POST with two short beeps and then power off automatically

 TITLE:
ThinkCentre M72e and Edge72 systems may fail to complete POST with two short beeps and then power off automatically

SYMPTOM:
ThinkCentre M72e and Edge72 systems may fail to complete POST, but the system fans continue to run on normal speed. The user may hear two short beeps after 8-10 seconds and then the system will power off automatically about 30-35 seconds after pressing the power button.

AFFECTED CONFIGURATIONS:
ThinkCentre

AFFECTED SYSTEMS:
M72e
Edge72

SYSTEM IS CONFIGURED WITH:
System BIOS F1KT57A or earlier

OPERATING SYSTEMS:
All Operating Systems

SOLUTION:
Do not replace any hardware for this issue. Perform the following steps to recover the system from a failing condition and then perform the Flash BIOS update procedure.

1. Remove all media from the drives and turn off all attached
    devices and the system. Then, disconnect all power cords from the
    electrical outlets and disconnect all cables that are connected to
    the system.
2. Remove the system cover.
3. Locate the Clear CMOS/Recovery jumper on the system board. See
    "Locating parts on the system board".
4. Remove any parts and disconnect any cables that might prevent
    your access to the Clear CMOS/Recovery jumper.
5. Move the jumper from the standard position (Pin 1 and Pin 2) to
    the maintenance position (Pin 2 and Pin 3).
6. Reinstall any parts and reconnect any cables that have been
    removed or disconnected.
7. Reinstall the system cover and reconnect the power cords for the
    system and monitor.
8. Turn on the system.
9. Wait 10-15 seconds for the system to automatically turn off.
10. Repeat Step 1 through Step 4.
11. Move the jumper back to the standard position (Pin 1 and Pin 2).
12. Reinstall any parts and reconnect any cables that have been
      removed or disconnected.
13. Reinstall the system cover and reconnect power cords and all
      other external cables.
14. Turn on the system to restart the operating system. Then,
       shutdown the system.
15. Perform the normal Flash BIOS update procedure using the current
      version F1KT65A, or later, located at the following URL:

http://support.lenovo.com/en_US/downloads/detail.page?DocID=DS029433
16. Turn on the system to restart the operating system.

How to Manage & Modify Bitlocker Using Command mode


Some times Bilocker will not allow to change or Manage using GUI mode.In that situation use the following command Mode Method to change and Manage the Bitlocker.

To know more about Bitlocker

The best method is Using Protectors.

Manage-bde: protectors

Applies To: Windows 7, Windows 8, Windows 8.1, Windows Server 2008 R2, Windows Server   2012, Windows Server 2012 R2

Syntax:

manage-bde -protectors  [{-get|-add|-delete|-disable|-enable|-adbackup}] 
                                        [-computername]
                                        [{-?|/?}] [{-help|-h}]

Parameters:


Parameter Description

-get

Displays all the key protection methods enabled on the drive and provides their type and identifier (ID).

-add

Adds key protection methods as specified by using additional -add syntax and parameters.
-delete
Deletes key protection methods used by BitLocker. All key protectors will be removed from a drive unless the optional -delete syntax and parameters are used to specify which protectors to delete. When the last protector on a drive is deleted, BitLocker protection of the drive is disabled to ensure that access to data is not lost inadvertently.
-disable
Disables protection, which will allow anyone to access encrypted data by making the encryption key available unsecured on drive. No key protectors are removed. Protection will be resumed the next time Windows is booted unless the optional -disable syntax and parameters are used to specify the reboot count.

-enable

Enables protection by removing the unsecured encryption key from the drive. All configured key protectors on the drive will be enforced.
-adbackup
Backs up all recovery information for the drive specified to Active Directory Domain Services (AD DS). To back up only a single recovery key to AD DS, append the -id parameter and specify the ID of a specific recovery key to back up.

Drive

Represents a drive letter followed by a colon.

computername

Specifies that Manage-bde.exe will be used to modify BitLocker protection on a different computer. You can also use -cn as an abbreviated version of this command.
Name
Represents the name of the computer on which to modify BitLocker protection. Accepted values include the computer's NetBIOS name and the computer's IP address.

-? or /?


Displays brief Help at the command prompt.
 
-help or -hDisplays complete Help at the command prompt.


-add Syntax and Parameters:

manage-bde –protectors –add [] [-forceupgrade] [-recoverypassword
                                               [-recoverykey ]
                                               [-startupkey ]

                                               [-certificate {-cf |-ct }]
                                               [-tpm] [-tpmandpin]
                                               [-tpmandstartupkey ]
                                               [-tpmandpinandstartupkey ]
                                               [-password]
                                               [-adaccountorgroup [-computername ]
                                               [{-?|/?}] [{-help|-h}]


Parameter Description

 
Drive

Represents a drive letter followed by a colon.

-recoverypassword

Adds a numerical password protector. You can also use -rp as an abbreviated version of this command.

NumericalPassword

Represents the recovery password.
-recoverykey
Adds an external key protector for recovery. You can also use -rk as an abbreviated version of this command.

PathToExternalKeyDirectory

Represents the directory path to the recovery key.
-startupkey
Adds an external key protector for startup. You can also use -sk as an abbreviated version of this command.


Represents the directory path to the startup key.
-certificateAdds a public key protector for a data drive. You can also use -cert as an abbreviated version of this command.

-cf

Specifies that a certificate file will be used to provide the public key certificate.


Represents the directory path to the certificate file.
-ctSpecifies that a certificate thumbprint will be used to identify the public key certificate
CertificateThumbprint
Specifies the value of the thumbprint property of the certificate you want to use. For example, a certificate thumbprint value of "a9 09 50 2d d8 2a e4 14 33 e6 f8 38 86 b0 0d 42 77 a3 2a 7b" should be specified as "a909502dd82ae41433e6f83886b00d4277a32a7b."
-tpmandpin
Adds a Trusted Platform Module (TPM) and personal identification number (PIN) protector for the operating system drive. You can also use -tp as an abbreviated version of this command.
-tpmandstartupkey
Adds a TPM and startup key protector for the operating system drive. You can also use -tsk as an abbreviated version of this command.
-tpmandpinandstartupkey
Adds a TPM, PIN, and startup key protector for the operating system drive. You can also use -tpsk as an abbreviated version of this command.
-password
Adds a password key protector for the data drive. You can also use -pw as an abbreviated version of this command.
-adaccountorgroupAdds a security identifier(SID)-based identity protector for the volume. You can also use -sid as an abbreviated version of this command.
Important

Important
By default, you cannot add an ADAccountOrGroup protector remotely using either WMI or manage-bde. If your deployment requires the ability to add this protector remotely you must enable constrained delegation.

-computernameSpecifies that Manage-bde is being used to modify BitLocker protection on a different computer. You can also use -cn as an abbreviated version of this command.

Name

Represents the name of the computer on which to modify BitLocker protection. Accepted values include the computer's NetBIOS name and the computer's IP address.


-delete Syntax Parameters:


manage-bde –protectors –delete   [-type {recoverypassword|externalkey|certificate|tpm|tpmandstartupkey|tpmandpin|tpmandpinandstartupkey|Password|Identity}]
                                                       [-id ]

                                                       [-computername ]
                                                       [{-?|/?}] [{-help|-h}]

Parameter Description

Drive

Represents a drive letter followed by a colon.
-type
Identifies the key protector to delete. You can also use -t as an abbreviated version of this command.

recoverypasswordSpecifies that any recovery password key protectors should be deleted.
externalkey
Specifies that any external key protectors associated with the drive should be deleted.
certificate
Specifies that any certificate key protectors associated with the drive should be deleted.
tpm
Specifies that any TPM-only key protectors associated with the drive should be deleted.
tpmandstartupkey
Specifies that any TPM and startup key–based key protectors associated with the drive should be deleted.
tpmandpin
Specifies that any TPM and PIN–based key protectors associated with the drive should be deleted.
tpmandpinandstartupkey
Specifies that any TPM, PIN, and startup key–based key protectors associated with the drive should be deleted.
password
Specifies that any password key protectors associated with the drive should be deleted.
identity
Specifies that any identity key protectors associated with the drive should be deleted.
-id
Identifies the key protector to delete by using the key identifier. This parameter is an alternative option to the -type parameter.


Identifies an individual key protector on the drive to delete. Key protector IDs can be displayed by using the manage-bde -protectors -get command.
-computername
Specifies that Manage-bde.exe will be used to modify BitLocker protection on a different computer. You can also use -cn as an abbreviated version of this command.


Represents the name of the computer on which to modify BitLocker protection. Accepted values include the computer's NetBIOS name and the computer's IP address.

-? or /?

Displays brief Help at the command prompt.

-help or -h

Displays complete Help at the command prompt.

-diasable Syntax Parameters:

manage-bde –protectors –disable [-RebootCount ]
                                                      [-computername] [{-?|/?}] [{-help|-h}]


Parameter

Description

Drive

Represents a drive letter followed by a colon.
RebootCount
Specifies that protection of the operating system volume has been suspended and will resume after Windows has been restarted the number of times specified in the RebootCount parameter. Specify 0 to suspend protection indefinitely. If this parameter is not specified BitLocker protection will automatically resume when Windows is restarted. You can also use -rc as an abbreviated version of this command.
-computername
Specifies that Manage-bde.exe will be used to modify BitLocker protection on a different computer. You can also use -cn as an abbreviated version of this command.


Represents the name of the computer on which to modify BitLocker protection. Accepted values include the computer's NetBIOS name and the computer's IP address.

-? or /?

Displays brief Help at the command prompt.

-help or -h

Displays complete Help at the command prompt.


Examples:

1) The following example illustrates using the –protectors command to DIASABLE protection until 
     the computer has rebooted 3 times.

     manage-bde –protectors –disable C: -rc 3

2) The following example illustrates using the -protectors command to DELETE all TPM and
     startup key–based key protectors on drive C.

     manage-bde –protectors –delete C: -type tpmandstartupkey

3) The following example illustrates using the -protectors command to ADD all TPM and PIN 
     protectors on drive C.

    manage-bde –protectors –add C: -type tpmandpin