
Group Policy is a feature of the Microsoft Windows NT family of operating systems that control the working environment of user accounts and computer accounts. Group Policy provides the centralized management and configuration of operating systems, applications, and users' settings in an Active Directory environment.
Remember : MSI files are application packages that come from manufacturers (or, you can also create them yourselves with 3rd party MSI repackaging tools.) Once you have the MSI file in hand, it's not a hard process to get it out there. Though, there is one pitfall, and I'll be sure to cover that here.
Part 1: Prepare and Share
The first step in deploying MSI files is in creating the share, and getting that package into the share. In Figure 1, I'm sharing a folder out. In the next step (not shown) I have copied my MSI and any supporting files into the share.

Figure 1: Share out a folder for your software deployment.
Part II: Creating the GPO to perform the work
Next, you're going to create a GPO which performs the actual work. In Figure 2, you can see the GPO I've chosen for the task. Be sure to link it upon the users or computers you wish to deploy software to.
In my example, I'm linking a GPO over to my East Sales Users, which contains, as you might expect, user accounts.

Figure 2: Create the GPO and link it over to users or computers
Part III: Match up the correct 'side' of the GPO
In Part II, you created a GPO which was linked either to users or computers. In Figure 2 we linked the GPO to where User accounts are contained. Now, in Figure 3, we need to choose the correct 'side' to implement our instructions.
Since we are deploying to users, that means we should create the directive on the USER side. If we were trying to deploy to Computers, you would choose the Computer side within the GPO.
In Figure 3, you can see both sides contain the Software Settings node, so be sure to put your directives in the right place.

Figure 3: Software Installation settings are on both User and Computer sides
Part IV: Deploy the Software
To deploy the software, right-click on Software Installation then select New | Package as seen in Figure 4. Then select your package and click Advanced (as seen in Figure 5.)

Figure 4: Select New | Package to start your deployment

Figure 5: Choose Advanced when deploying software to see your options.
When deploying your package you have several options available to you as seen in Figure 6. The most important ones are Published / Assigned and Basic/Maximum. Here's what they mean:
- Published / Assigned:''
- Published means that the application appears in Add/Remove Programs applet.
- Assigned means that the application appears on the start menu.
- Basic/Maximum:''
- Basic means that the user will see few / no screens when the application installs.
- Maximum means that the user will have full interaction when the application installs.
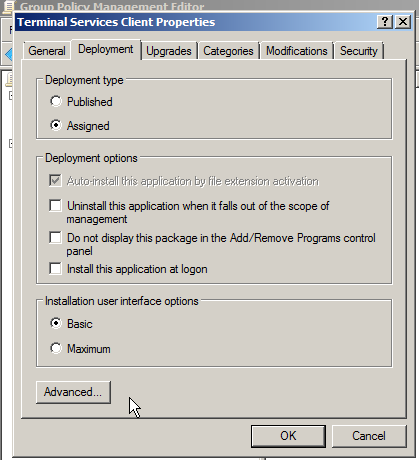
Figure 6: Advanced Deployment options in GPSI
Part V: Seeing the software install
Windows cannot install the software while the user is already logged on.
If you log off and log back in, only then will you see the applications' icons , as seen in Figure 7.

Figure 7: The deployed application's icons.
Then, selecting the software's icons will perform the actual install, as seen in Figure 8.

Figure 8: The actual install of the software occurs when users select the application.
No comments:
Post a Comment